Showing posts with label bedroom. Show all posts

Monday, February 09, 2009

Back to work, if I can get up to it.

I have been trying very hard to motivate myself. Usually, I am prone to procrastination for a short time and can be preoccupied with nice weather, playing with my daughter, or any number of other things but this is different. A funk has settled over the Tiny Bungalow and it is unlike any funk I’ve been in before. I know the cause: it’s the economy, stupid. I don't think I'm alone here. Is anyone onyone else experiencing DIY paralysis in the wake of the recession?

Last fall, we were all excited to start a series of jobs: get some re-wiring done, set the groundwork for upstairs painting and wood refinishing. It was all very exciting, until the layoffs began. We’ve gone through three excruciating rounds. I, luckily, still have a job. For a whole myriad of reasons, I don’t feel so lucky. It is partly because they cut my pay, partly because I have to sit and look at empty desks all day but mostly because of the angst over the next round of firings.

I am shocked by how much this work stuff seems to have crept into my work at home. I used to find refuge in the house work but now, plagued by concerns that begin with the thought of not spending too much, it has become something that I sort of dread.

In the meantime, while I wait for the cloud to pass, I have tried to pinpoint projects around the house that I can do and not spend any money. The painting and sexy stuff in the main living spaces will have to wait and so will the dreams of any of the considerable work I was considering in terms of an addition. I’ve re-organized closets, cleaned and de-cluttered, and this weekend, I started stripping the door to the bedroom closet.

I thought this last project was a huge step to DIY recovery. Maybe if I accomplish something on the house, without expenditure, I’ll feel a bit better. I’ll let you know how it goes in another few weeks.

Tuesday, July 22, 2008

Look What I Did

The folks at Housblogs are having a contest so I thought I'd throw my hat into the ring. It is sponsored by True Value. It is to promote their D.I.Y. All-Star Contest 1st Home Edition.

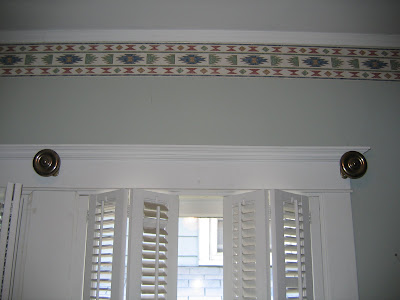
I figured that the only room that would meet the criterion for this at our place would have to be our "master" bedroom. In a Tiny Bungalow, we are using the term "master" very liberally here but we think that the transformation, a year-long process, is pretty dramatic. When we moved into the place, the room looked like this:


Though we found the decor to be pretty interesting, something inside me made me think that the house was ready to shed its pink carpeting, white shutters, white ceiling fan and Southwest border and other ecouterments.
Several months floor refinishing, paint stripping and re-staining, plaster repair, re-configuration of molding, new ceiling fan and a few new pieces of hand-made furniture, stenciling, and art and it was transformed to our first "finished" room in the house.

Thursday, April 24, 2008

Picture frame completed

I finished the frame and I am happy with it. It is big and makes the old one look a little anemic but it looks just right for the wall. I am glad I didn't go larger with this thing (my first instinct). Now I have to get my ass in gear and finish stripping the closet door. Unfortunately, it looks like winter is coming back to Chicagoland this week - hopefully it doesn't get too cold.

I should also probably add a couple pointers about hanging large artwork on picture rails. Generally, the hooks on the back of your artwork that you use to hold cable or chord should be attached to the side rails. This is always stronger than the top rail where joints can brake and the entire picture (and mat and glass) can end up on the floor. I am using 1/4" loop hooks that are about a 1/2" long (into the wood).

People have also asked about how you minimize the hanging angle. You can't eliminate it totally but the higher up that you mount the chord or wire hooks on your frame, the lesser the angle will be on the wall. I am using hooks at about 3" from the top of the picture for this one and due to the weight and size, the angle is minimal. On smaller pictures, you can get as close as an inch from the top rail.

Sunday, April 13, 2008

Picture Frame

The highlight of the weekend was a trip to scenic Schaumburg, Illinois. We make this expedition once or twice a year to visit Ikea and to buy $200 worth of stuff we don't need. Now we have another reason to travel out there: Rockler Hardware.

I have never been to the store but needed to get some table-top mounts for the table I have been making. For woodworkers, this place is about as close to heaven as I can imagine with good stock of all sorts of hardware, finishes, tools, etc. I picked up the things I needed and a few things I didn't. I am inspired to make more use of my tools and it is nice to know that I have this resource not too far away.

It is still a little cold to start stripping the final door for the bedroom so I found other stuff to keep me busy. One project I started was a frame for a photograph that I had enlarged. I bought some mahogany some time ago and started cutting it down the other day. I spent some time in the morning reconfiguring the shop because it just hasn't worked for me. I made a bit more space for the table saw and can now actually use my workbench/desk as such (instead of a place to just gather clutter).
I am getting a little better with the cutting - though I saw some guides and jigs at Rockler that would definitely make this go easier. Last Father's Day, I got this saw. Maybe this Father's Day, I'll have to lay down some hints.
I am making splines to attach the frame at the corners and cut out notches in the back to receive glass, mat, and photo. It is 30"x36" and should be dramatic in the tiny bedroom. It will be a simple frame but I think it will look nice.
I'll work on assembling and finishing it during the week and will start cutting the mat for the photo next weekend.

Wednesday, March 19, 2008

More Stenciling Lessons

If you were keeping track of the punch list on the bedroom door, you would notice that another item is crossed off - the stenciling.I finished the stenciling and am pretty happy. I bought another stencil after the first one got gummed up and produced some hairy stencils. The latest stencils came out great. I owe it all to the stencil adhesive and I strongly recommend this stuff as it pretty much makes the work moron-proof.
I don't want to know what is in this stuff - I think that "Extreme Danger" and the skull and cross bones says it all but I have to admit, this stuff was awesome. It held the stencils to the wall and produced very crisp patterns. I feel like going back and re-doing 5 or 6 of the hairy ones but I won't mess with what is finished.
The bedroom is shaping up pretty well. I hope to make some headway on the rest of the punch list over the next few weeks - hopefully before the weather gets too nice and I am forced to start more work on the yard.

Sunday, March 09, 2008

What I learned about stenciling

Before I go into detail about the stencils, I thought I'd lighten things up with an update on the radiator covers - I found a faux hammered spray paint that oddly enough, I like. So this is it. I typically find this kind of thing tasteless but it actually looks good so I am keeping it that way.
Now for an account of the stencilling.

I don't think I need to explain to most of you about why I stenciled. It is a typical and inexpensive means for decorating bungalow interiors and though I didn't choose a "historic" design, I felt the one I did choose went with the room design and had a nice Arts & Crafts spirit. If I am going to go through the pain and suffering to finish the stenciling job, I wanted to share some of my angst so that others can benefit from it.

The first thing I learned with this project is that I am not built for stenciling. There is a level of dexterity and patience that I am just lacking. That said, there are definitely some techniques that I have learned. When I started, the stencil was nice and flat and clean and the resulting stencil was something like this: By the time I had completed 12 or so stencils, it looked more like this:

Now don't tell me you can't see the difference (and no, the blurriness of the photo is not what I am talking about). By the time I got to the latter stencils, things were getting a little "hairy". The stencil became gummed up with paint and the brushes a little worn.
I taped the brushes as recommended and I was dabbing off a lot of the paint. But I was using acrylic paint and it was causing problems. I should have been forewarned as the folks at Trimbelle River Studios said: "Continue to pull the paint from the stencil plate into the cut opening. This will help prevent build-up on the stencil". Easier said than done. Also, this is a fine technique if you want the stencils to have a more ethereal look and I wanted the color to be a bit richer.
So what did I do?
I gave my stencil a bath. I also got more brushes. And this actually worked for about 2 more stencils and the thing became gummed up again. What I am going to do is order another stencil to finish the job. I am over half-way done but I think it is worth it. I looked back and the first 10-12 stencils are fine. I think I am also going to spring for the stencil adhesive that the stencil-maker recommends. I will go back and re-do a few of the stencils I think are messed up and hopefully it will all look more homogeneous.
As usual, the photos don't really look "right" but they give you an idea of the result. The pattern was easy to stretch around the corners so the design looks pretty good too. I wish the design were slightly smaller for the scale of the room but that would have meant more stencils so I guess I shouldn't mention it.
I ended up using three colors: green and blue are the most prominent, and then I gilded the center of each forget me not with gold paint - which looks real good because it gives variation/depth to the overall design. I am happier than I thought I would be with the whole stenciling thing and I am glad I tried it out but once I finish, I don't think I'll be trying this again.

Saturday, March 08, 2008

Stenciling

The stenciling is coming along a little better than I had hoped. The design and colors look nice in the room I'll have to write more when I am finished as there is definately a learning curve with this stuff and unlike most projects, the last groupof stencils does not look as good as the first. In the meantime, you can see the progress below.


Friday, March 07, 2008

Stenciling time... ...or should I wait until I get well

I have been sick the past few days - really sick. When I am around the house and actually do no work on the house, you know it's not good.
Yesterday I felt almost o.k. for a couple hours and after watching every Tivoed episode of Rock Solid, Sweat Equity, Landscapers Challenge and Martha Stewart, I felt invigorated. The Martha Stewart, particularly made me feel like I should start tackling the stenciling in the bedroom.

I pulled out an odd piece of drywall and painted it the same color as the wall and used stenciled with the two color schemes I chose. I think I am going to go with the darker scheme or maybe lighten it a little. I also think it might be neat to have the center of the flowers gold.
I have a long way to go before I get the hang of this though. I am also not so sure I love the stenciling pattern we chose. I don't think the wife is so crazy about it either. Ahh, I can always re-paint over it, right?

Sunday, February 24, 2008

Trim complete, table still progressing

I finished the toe molding in the bedroom yesterday. It is odd. The photos suggest that there is a radical difference between the color of the molding and the baseboard. In actuality it's not that different. We used 3/4" quarter round for the molding. This is the size that was there. No, I did not strip the original and replace it - too much of it got ruined in the demo and there were still about a thousand staples per foot in that stuff - it looked like crap.

It is amazing how "finished" this makes the room seem. It also brings attention to all the little things I need to do - like touching up the paint at the edge of the plaster and cleaning the floors and baseboards (there is still some residue from when I washed down the plaster). There is also a splotch where I spilled some stripper and I need to fix that somehow. I figure I can hold off the cleaning and touch-up until the very end.

I put a coat of Cabot's "cherry" stain on the table. It is looking nice. I am going to finish it with a few coats of wipe-on poly and I'll then put on the top. The little gap is still bothering me - I may take it apart once more and try to re-align it but my smarter side is saying leave well enough alone. Hmmmm.

Honing my woodworking skills

The night stand is coming out o.k. I spent the weekend assembling it and sanding it down. There is a slight mis-alignment in the legs but I am not sure I want to take it apart once more to fix it. I feel if I do this, I'll definitely screw it up so I think I might live with the 3/32" inch gap at the cross-pieces. It's annoying because when I fit it together there was no gap - this only occurred when I began screwing the pieces in place. I think that I need some better tools as I believe the "balancing act" I used to assemble didn't work so well.I have been trying to work out a nice finish too. I bought several types of stain and I tried them all out on some scrap wood. I don't like any of them so its off to the hardware store again this morning to find something I like.

The bedroom is also progressing. I stained all of the toe molding and should have it in place before lunch today. I think I am down to about 8 things on my punch list, two of which (a new rug and curtains) I am trying to pawn off on my wife.
I can't wait for the weather to get above freezing so I can begin stripping the final door in the room.

Wednesday, February 20, 2008

Keeping busy in the cold weather

It’s been cold here – very cold. Contrary to what you might think, Chicago has relatively wimpy winters. This year has been the exception. The nice part about all the bad weather is that I can keep working on the bedroom.

My plate is pretty full and I have several projects going on. After a short argument with my wife, I gave in and did not run out to Toms Price and buy a new Stickley night stand for the bedroom. Inspired by some of the woodworking I’ve seen on the houseblogs, I decided to build one instead.
I came up with a design (actually, I came up with several) that had a mission style appearance and would fit nicely next to the bed. I simplified it, simplified it some more, fretted for hours about how I would put it together and I finally have something to show. I’ve cut all the pieces except the top. I am particularly proud of the tapered legs. I am not a woodworker and I actually made a jig to cut them all the same. I am sure that you woodworkers out there are not impressed but when you spend more time making a jig then you do the actual product, I consider it a big deal.

I won’t be using any fancy joinery on this one - baby steps. Instead I got some ball-head screws to hold most of the pieces together. I will blog more on my furniture-making exploits once I get some sanding done and start assembly. Who knows, a trip to Toms Price may still be in order.
We also made a decision on the border in the bedroom and it arrived yesterday. It is from Trimbelle River and is a forget-me-not pattern. Now we just need to experiment with some colors and paint the border. This scares me more than the furniture project.

Finally, I got my photo of Mt. Lushan enlarged and will be making a frame for it out of some mahogany I bought (by the way, that's my leg-tapering jig sitting next to the pile of mahogany in the basement). The colors in the photo were my inspiration for those on the walls and the Asian view fits the style of the room pretty well. I can’t wait to start that project – probably by April.


Seriously though, I am starting to see the light at the end of the tunnel on the bedroom. I picked up all of the toe molding and then all I have left is to strip and re-finish the closet door and I am done.