Showing posts with label lighting. Show all posts

Monday, December 05, 2011

Light Issues Continued

I can't stop thinking about the lights for the dining room but am still being patient.  In the meantime, I have put together a fixture on Rejuvenation that I can live with.  I have to have another go around with them to see if it works but it seems okay.  I've gotten alot of great advice on this subject and it seems that I should hold out for smaller older fixtures that are less obtrusive.  The alternative of living with the dark corners and buying beautiful Van Erps to lighten those small spaces up is probably out of the question also.
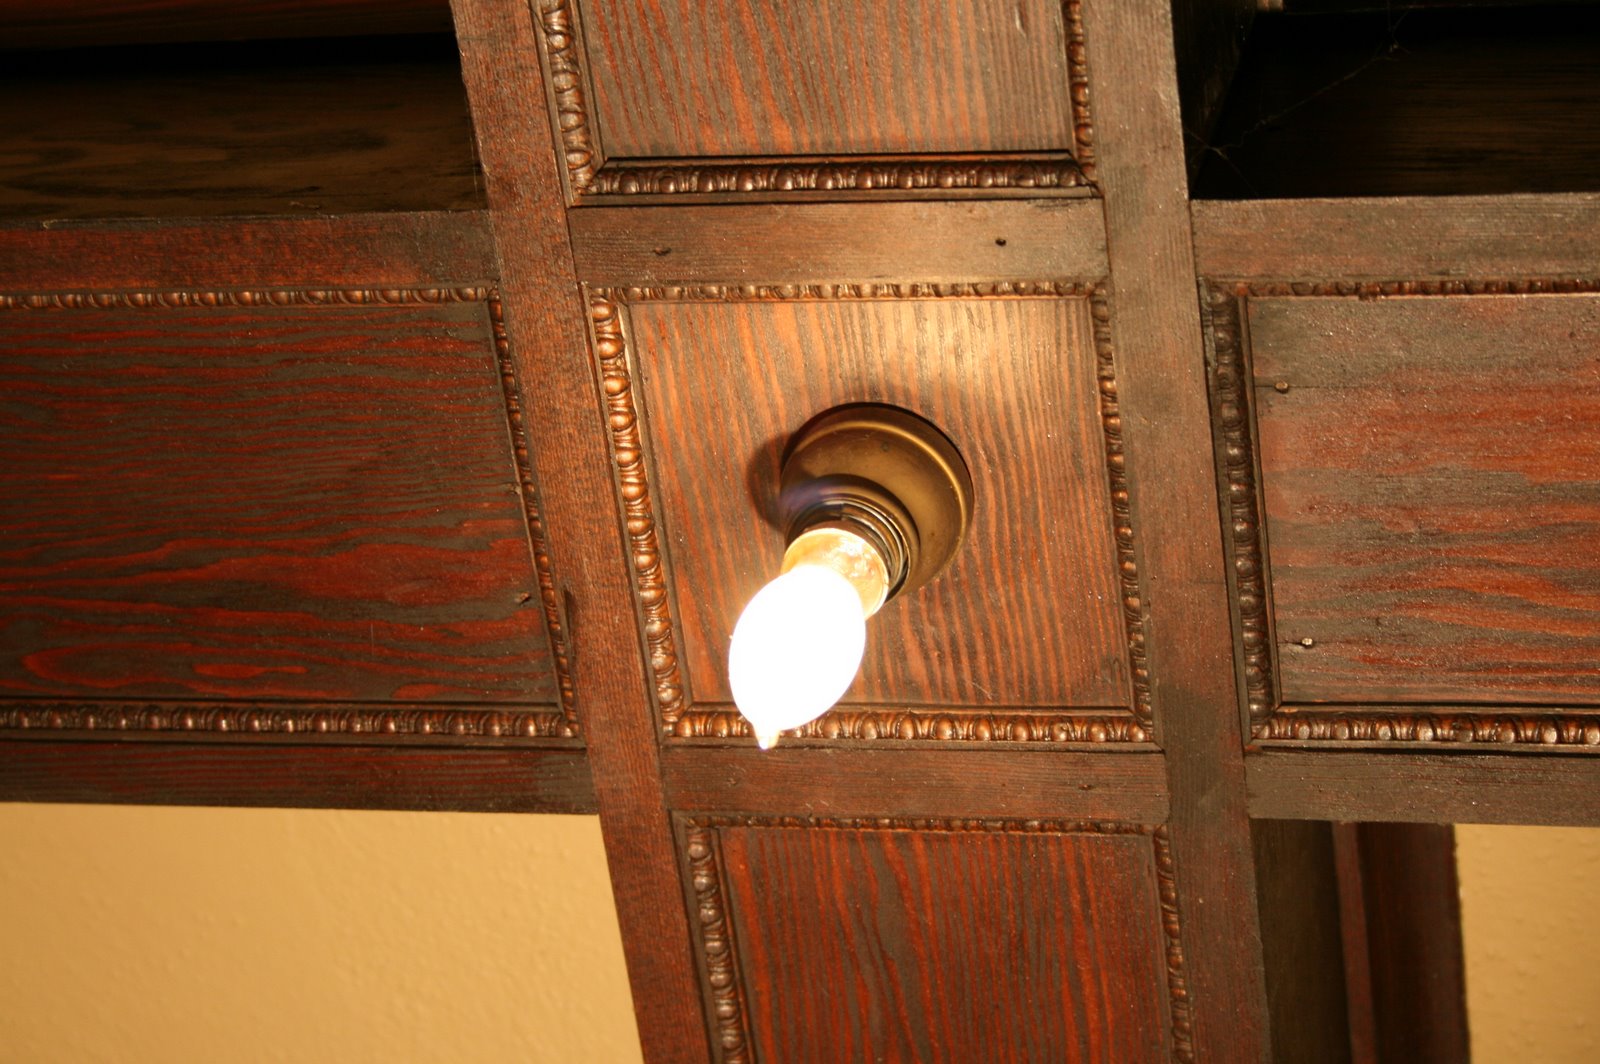
I decided to consider the new fixture more seriously.  In order to get an idea of how it would look in the room, I decided to do a mock up.  It's not quite accurate but it does the trick.  The neck is a little long and it is kinda crooked but it conveys the idea.  Actually, I like the mock up so well, that I think I'll be making about a hundred of these for the ceiling for my next party.
I don't think it will look original to the home but that isn't too much of a concern.  My big concern is to get light in the space, to have it look cool, and to compliment the rest of the room.   
I am still concerned about how deep this canopy size is but I do like that it uses the same metal piece for the canopy that is used for the bottom finial on our main lighting fixture.  I think it won't look bad at all with the other fixtures in the room.  I also intend on using an old-looking exposed filament bulb so hopefully that will add to the interest of the fixture.
Then again, I still don't feel right about it all so for now, I will remain patient.  Once I start painting the mural, the lack of light in the room will surely overcome me.

Wednesday, November 30, 2011

Looking for some lighting advice

I have some lighting issues.  When I installed the new light shades, I never anticipated how dark this would make the dining room.  I really like them and don't want to change them but need more light in the dining room.  There is a pretty simple solution: in keeping with traditional lighting in other bungalows, I could add exposed bulb fixtures for ambient lighting at the intersections of all of the beams in the room.  The folks over at Laurelhurst did this in their bungalow with new fixtures to great effect.   
For the past several days, the folks at Rejuvenation have been diligently trying to help me out in this respect.  Unfortunately, the only thing we can come up with is a variation of their Kellogg fixture.  It would be nice but my concern is that since my beam ceiling is relatively small, the fixtures would seem quite large.  The Kellogg would completely cover the intersection of the beams. 
What I was hoping for was something more modest, that would sit within the intersection.  A new brass fixture with a maximum diameter of 3 3/4" would be ideal.  The Kellogg is a 4 1/2" diameter fixture.  The issue is that most modern manufacturers create fixtures sized for standard electrical boxes.  Smaller boxes are made but not smaller fixtures.  At least that's what I have found so far.  
Does anyone out there know of any additional period lighting resources that may help.  I've looked at all of the usual suspects: Brass Light Gallery, Schoolhouse Electric and Rejuvenation and have found the same at all places.  I'd appreciate any leads you might have.

Monday, October 24, 2011

The Living Room Light

It didn't turn out exactly like I thought but I am happy with it anyway.  I was able to purchase new light hooks, made of brass, from Antique Lamp Supply.  I opened up the existing chain link and wrapped it through the hole in the new hanger. 
The new hangers hold the light in place with screws, not with the (broken) springs like the last set of clips had.  It was a trick finding the right size (length) bolt but that wasn't too tough.  
The bowl was also initially pretty dirty.  It is a mix of a sort of milky and glass and where there was dirt on the frosted design, it looked pretty bad.  I guess cleaning frosted glass can be a tough.  A quick internet search yielded many folks that had similar problems.  One woman's cleaning story had he washing the thing in dish soap, bleach and all sorts of other things when she finally came upon Simple Green that took all the dirt off.  I was fortunate and started with the Simple Green and it worked magic.  The light shade came clean and looks pretty good.   
It really is the prefect style of fixture for the room.  It will be very different from the dining room that has mostly directional downlight.  A lot of the light goes up to the ceiling and I have it on a dimmer so it can be lowered to a nice soothing glow.  Time to enjoy the light and concentrate on the wood restoration and painting.

I just realized, I don't think I have any pictures of the old track lighting.  I think the only one I could find is one taken by my daughter when she was about three years old.  Maybe its just her photographic composition but I think I like the new fixture a lot more.


Thursday, October 20, 2011

The saga of the living room light continues

The new light shade hooks arrived today.  They are not as decorative as the ones currently on the fixture but it looks like they will work and they still look nice.  More to come.
 

Sunday, October 16, 2011

The saga of the living room light comes to an end

See, the light looks great.  It's perfect for the room and the mottled finish really doesn't bother me at all.

There's only one small problem.


 In order to hold the bowl shade in place, I have to use rubber bands.  My previous idea of using some wire doesn't work because the rim of the bowl gets in the way.


It's not that I don't think that the blue rubber rings that hold my broccoli together are aesthetically pleasing.  They just might not be the right thing for this particular room.   


I think I am going to have to chalk this one up to a learning experience and move on. 

So, where can I get an inexpensive fixture to hang my bowl from???

Saturday, October 08, 2011

A light is just a light... ...or is it?

So I am trolling Craigslist the other day and knowing that I am taking on my plastering project and that I will need a new living room light, I was searching for antique fixtures.  I knew what I wanted: a Classical Revival style fixture to go with some of the transitional detailing in the house yet a globe simple enough to seem almost as if it were in the Arts & Crafts style.  To my surprise, I come across the above pic.

Now, I like old houses and taking on big projects but any projects with any level of intricacy are my Achilles' heal.  Since the price wasn't so high, I figured, "what the heck", and against my better judgement, I contacted the seller and drove a couple towns over and purchased it. 
I started by taking it apart and trying to clean it as best I could.  It did not come as clean as I wanted but I figure, I could live with it.  I hoped to learn more about the manufacturer so I began a Google Patent search looking for the fixture.  I had no luck but found a lot of other cool stuff.  So I went back to cleaning.   
After careful examination of one of the parts, I found a patent number and date.  The number didn't help at all with finding the item but the date worked wonders.  To my surprise, a patent was taken by H. A. Framburg in 1917 for an electric light fixture.  It is certainly not the item I purchased but I am sure they used this particular hook piece on several items.  What is coolest is that the hole that is in the middle of the anthemion form should have held another arm to a light globe that extended from the main light bowl.  I bet it was pretty cool. 

What is more interestingng is that I recognized the company name immediately.  Framburg is still around and the company has an interesting history. 

As I mentioned, I cleaned the item up a little but not as much as I had hoped.  I have been going back and forth in my mind to either abandon this project or embrace it and live with a VERY antique-looking fixture.  I decided to hang the bowl from the hooks and see what it looked like. 
I actually don't mind the mottled finish and think that it can still look good.  Except for one problem: I just realized that almost all of the hooks I have are broken.  There is a spring on each on that is supposed to clasp around the rim of the bowl and hold it into place.  Without the spring, the bowl easily falls off. 
So now I am at another impasse: try and learn how to manufacture my7 own springs or give up.  If anyone has any thoughts, I'd love to hear them.  Part of me wants to contact Framburg and see if they can help.  I bet they'd laugh at me.   I guess I need to sleep on it.
By the way, if you are the tinkering type and get into a project like this, a patent search is a pretty great thing.  I discovered all sorts of cool lights while doing this.  Below is a design for a light fob.  This would have been a decorative piece that would attach to receptor holes on the globe/bowl hook.  It might have come in handy for people that purchased this original Framburg fixture but didn't want the side arms. 
The multi-light notion seemed very popular: a bowl light to provide ambient lighting and then single bulbs pointing down within shades to provide task or directional lighting. 
Finally, my favorite: a light with an integral planter in the bowl.  I would love to see one of these in action.  If anyone ever finds a picture, please let me know.

Monday, September 05, 2011

Under-cabinet Lighting

Our kitchen sucks.  I can't think of anything redeeming about it.  From the spectacular appliances, to the spacious vinyl cupboards, to the shimmering faux marble counters, it is a wall to wall playground for any epicurean.  Wait, I do like our maple floors.  Floors aside, the kitchen is the one room in the house that could really use a massive make-over.  This weekend, I decided to do a small project to perk this space up a bit.  I installed under-cabinet lighting.    
I purchased two sets of Ikea's Inreda system of LED lights.  The good thing about Ikea is that it is cheap and any moron can put their stuff together.  The bad thing about Ikea is that they are cheap and though any moron can put their stuff together, you have to be slightly above moron in order to make sure you leave the store with all of the items you need to assemble the product you think you just purchased. 
The system is simple.  It is a plug-in set of four lights with a switch.  Two strings of four lights can be connected to one "system".  The first problem I encountered, after I mounted the lights, was that I realized the chord to connect the two sets of lights together is sold separately.  So back to Ikea I go...   

After my second trip to Ikea, things came together nicely.   
The next challenge is getting the wires connected to the bottom of the cabinets so they are out of the way and you can't see them. I chose to use tie-wraps and adhesive tie-wrap connectors. This seems to work okay but I am having issues keeping them stuck under the cabinet.

I am happy with the final result.  I do wish I could get these hard-wired to a switch instead of the awkward plug-in switch.  I also don't want to have to continually re-adhere the wires to the bottom of the cabinets so I may get some sort of mechanically fastened raceway to keep them up there.  Regardless, it is a big difference. 
Look, now you can see all of that artificial printed veining on that spectacular formica counter!


Sunday, March 14, 2010

Fixing holes


According to my blog (I had to check back because it has been so long since I did anything and I couldn't remember), I had some lighting fixed last August.  This was the first step towards actually refinishing the hallways (front and bedroom) in the house.  The down side of the project was that there were two gaping holes where the old sconces were.
It seems like a simple enouigh project but it took a little extra thought.  The lights were in place over an old-fashioned gas junction box.  It was an odd size and there wasn't an apparent way to easily "fill" it.  I ended up cutting down some lath and back-screwing it to the mounting-holes for the fixture on the box.  I then screwed a piece of gyp board to the lath and filled it with plaster.  
I am happy with the result. I now have a nice flat wall and can begin deciding on the paint color.  Actually, this is a sort of half-truth.  I started hanging up paint chips back in August.  They've been adorning the wall like an abstract art project since then.  I think I know which one I want to use.  Refinishing the woodwork is another story.

Tuesday, September 29, 2009

Let There Be Light, Continued...

The entry light arrived from Rejuvenation and I put it up.  I chose as simple a fixture I could find that had a little bit of style so that it goes with the transitional look of the rest of the house.  I am happy with the fixture but the installation had a couple problems. 

The first problem, I anticipated.  The fixture is mounted to a pancake junction box so it does not sit flush with the ceiling.  I'll have to get something, a pice of trim or gasket to take up the half-inch space. This isn't too big of a deal since I'll have to take the fixture down when I paint the ceiling.  The second problem I had was with the fixture mounting screws.   It seemed that the folks at Rejuvenation didn't put the fixture together before they sent me because the holes drilled in the fixture didn't quite match those in the mounting bar that came with it.  I didn't want to send it back so I decided to file out the holes, each about 1/16 an inch so that I could stretch it to meet the mounting bar.  I'll have to let them know to watch out for this on other orders.  It was a pain in the ass but my remedy didn't hurt the appearance or mounting of the fixture.

All in all, I am happy with the fixture and hope that no one trips on the front steps anymore. 

Sunday, September 06, 2009

Taking it off

AKA: How to freak the shit out of my wife. It's usually pretty easy to get my wife going. The stuff that really gets her going usually involve a project I start, without her knowing it, while she is out. She usually comes home in the middle of me muddling with something, shakes her head and goes into the other room. You can imagine how she reacted when she came home to this in our side yard:  
It all started innocently enough. I was trying to prep the ceiling for installation of the fixture over the front step. Well, you know how that goes: If I am going to do it right, I have to re-paint the ceiling. If I am going to re-paint the ceiling, I have to install the molding that the PO took off. If I am going to do that, I am going to have to remove some siding. If I have to remove some siding, I better just take the opportunity to remove all of the siding at the entry. Sounds logical enough, right? By the way, this is the fixture I chose for over the steps. It’s from Rejuvenation. I think it is going to look pretty cool once it arrives and is in place.
I think where my wife's freak factor started to rise as she could see that as I started removing the siding, I was getting excited about what I was finding.  The wood was in decent shape (the colors hideous though), and the trim work looked pretty nice.  It also revealed that I can actually put my porch screens on the outside of the house, where they belong.  Right now, the aluminum siding covers the receiving trim and we are forced to jam them on the inside. 
X
Anyway, during all of this, there is some pacing and "nervous cleaning" going on inside the house.  I am sure "Where the hell is he going to stop?" was running through my wife's head, on repeat, a thousand times a minute.  Well, yesterday, I stopped at the entry but who knows what I'll do if I get bored today. 
 Just check this out.  Why would you ever cover this up???
Anyway, I think that she is safe from a big project... ...for know.  I can't promise what will happen next spring though.