I have a huge list of things I am trying to get through by Thanksgiving. Last weekend was lousy but I did get the wood funiture waxed and I built a shelf for my wardrobe so I can actually use it.
This weekend, I did a little better but I still don't feel like I accomplished much. I moved all of my tools to my work bench (not on the porch, in the dining room, in the bedroom, in the garage, etc.). I also cleaned my work bench and the area around it. This is a bigger deal than you might think.
I was also able to get the insulation on the hot water heater. It doesn't seem to fit and I feel like it is a crap shoot in terms of additional savings but I consider it a "finished" project and I guess we'll see if there is any residual savings.

I also did some wood patch and sanding on the bean bag boards. They are looking pretty good but I think I am going to take a little more time and patch a little more to make them look better. I also want to show off the designs but have them mocked up, half-finished, so it isn't worth doing that right now.


I also finished demolition on the soffit at the bottom of the basement stairs and decide I now want to do more demolition. I intended on refinishing this area but now believe that head room is more important than a finished ceiling so I will come up with a way to trim and paint the exposed duct and piping to make it look acceptable.
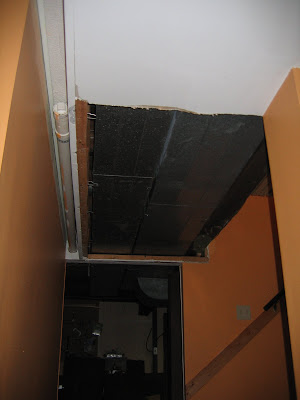
My big project, after this is finishing the basement bathroom. I made no headway on this - but I did use the bathroom several times and it made me think about the project. I guess that doesn't account for much. This room and now the "additional" work on the soffit really makes me feel like things are piling up.
To make matters worse, I am starting to make yet another project for myself. I have wanted to bring my vinyl upstairs for some time now. I got these cool wireless speakers for an IPod and luck would have it, I can hook up my turntable too it and it sounds pretty good (and I can then move my speakers anywhere in the house). Problem: I have no place to put the turntable or any records. Solution: hell, I can make a rack for it that would look pretty good. I quickly shelved the idea because I felt my marriage couldn't handle another "diversion" from the work at hand - until I found this cool wood in the attic.

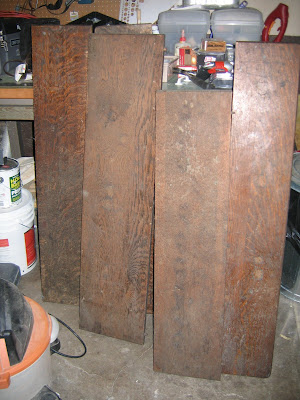
It is a pile of quarter-sawn oak from an old table top. It looks cool and there is quite a bit of it five 3' pieces. Yeah, it is stained and I'd have to sand it down but it looks really cool. I could design a cabinet and use this wood (so I won't have to spend any money). This might be a way to make something without pissing off the wife. When she says, "don't you have better things to do?", I say, "but the wood was free so I'm not spending any money". She'll say, "Oh, Okay" before she even realizes that I didn't even answer her question, right? Maybe it's in my best interest to not start this project until I get a few more of smaller "must-do" itemss under my belt (I'm not a complete moron, you know).


 I have been getting ridiculed by my friend Steve for not finishing these yet. He's also remarked that I am wasting my time because once they are done, I won't let people throw the corn bags at them anyway. He may be onto something there...


 I had better luck with the masking tape on this go around. I practically burnished it into the board but it worked. The lines are crisper and I have almost no touch up to do on the letter. I haven't figured out how to do the circles yet but I am sure something will come to me. I am also not completely satisfied with the overall quality. It needs something. I may get some white paint to punch a few areas up or maybe do some more line work in alternating colors. Given that I have practically no time to finish... ...why do I do this to myself?


 I finished the stripes on the "football" board. I have some touch-up to do with orange afterward but I think it is going to look good. What is up with masking tape? I always end up with paint that bleeds underneath it. This is why I never understand folks that would rather masking tape a room in lieu of cutting in by hand. Maybe there is some masking tape magic that I just don't get?
 The design is going to be a skewed series of lines and an SU that looks like a basketball court and football field. After doing a little research, I found out that the Carrier Dome court/field just has a single "S". I guess this makes the design much simpler but I have a feeling I'm going to have to add something to jazz it up a little. I can make that judgement as I move forward.
 I put a coat of primer on and have a somewhat elaborate design for the boards. I hope I can get it done. The bags arrived this week and though I got the bags and the paint at different times, I think the colors are pretty good. The design will be an SU and some graphic lines like a sports field/court. What's nice about the paint and bags is that if my nephew hates them, I can always take it back and re-paint things in an Illini or Bears motif and it all still works.
 I'll update as the painting progresses. Also, we have a set that I made for the Tiny Bungalow. How long it will take before I start painting those?

 I decided that I liked the sturdiness of the fixed "board" leg but I also wanted it to be removable. Again, my friend Steve suggested a "stow away" leg that could rest under the board when not in use and could be easily pulled out when needed.
 Friction holds the leg in place when it is not in use. I installed a cleat along the leg to make it easier to pull out from the storage position.
  And installed at a location that adds a little additional support when it is in the "play" position.
  It works perfectly and doesn't look to bad either.
 I between various projects around the house and yard to ready things for winter, I'll begin sanding and painting in the next few days.


