


 Either the League of Women Voters needs to rethink their decorated rain barrel fundraiser / publicity piece or the OP needs to invest in a few more trash receptacles for Lake Street. FYI, this is right in front of one of the finest buildings in the world and one of the most visited landmarks in the OP. Nice touch. The up-sides: At least people were trying not to litter or perhaps we have yet another re-use option for plastic food containers (or old rain barrels)?
 The set up
Putting the barrels into action is maybe the most involved part of the process. Position the barrel under the downspout of your home. In order to get good water pressure from the nozzle and for easier access to it, it is also important to get the barrel off the ground. At my place, I have them standing on two concrete masonry units. Cut the downspout just above the barrel top and direct the spout into the barrel. There are a couple of small concerns that should also be addressed. The first one is having something on the barrel to prohibit mosquitoes from breeding in your barrel. For this, the downspout can sometimes be hermetically sealed to the barrel. This is a little difficult so most folks put a screen over the barrel, yet under the container lid to prohibit the mosquitoes from getting in.
The second concern is overflow. The average barrel fills up quickly, in almost minutes during an average rainstorm. Most barrels are outfitted with a connection at the top of the barrel for an overflow hose. This is the simplest way of handling excess rainwater and it can be directed into your garden area. There are other systems that can be found online that connect to your downspout and redirect water to the ground, a storm water line, or another barrel.
In the wintertime
The rain barrels don’t function so well in wintertime. Barrel owners have a series of views on what to do come winter. I’ve always been concerned about the life of the barrels so hope to prolong it by reconnecting the downspouts and let them drain directly to yard and planting bed areas. I store the barrels upside down, under the eave, to keep them dry. I know of some local folks that just keep them connected without problems so far.
Going all out
One way to make the barrel more maintenance free is to attach it to a soaker-hose and snake the hose around your garden. I've had mixed results with this as the hose seems to get clogged or not have enough water pressure in it to work after a month or so. Sometimes I flush it out by hooking it up to a spigot or I just get lazy and resort to my watering can.
There are other ways to enhance the experience of the rain barrel in your garden. At my place, to disguise the screen at the top, I have placed pebbles and stones to give it a sort of fountain experience.
 I also removed my downspout entirely and installed rain chains to add to this “fountain-like” experience. These are also available online and even at local garden stores. I got mine at Target. The overall look and sound in the rain is pretty nice, even with the rush-hour traffic in the background.
 It was my birthday last week and in addition to the lilac from my mother in law, my wife got me a neat glass sculpture. Since my mom sent me a little cash, I figured this would be a great time to get the chains. Thanks mom.
 I am sure that there are some of you out there that don’t have a clue about rain chains. Commonly known as a Japanese invention, they create a surface sown which water can flow from roof gutters to the ground. They can be as simple as a linked-chain and as complex as sculpted animals that are interconnected to create a garden water feature. Western architects like Frank Lloyd Wright, who were inspired by Asian designs often, incorporate them into their buildings. Wright’s Fallingwater has some prominent ones.
 At the Tiny Bungalow, I’ve always wanted on at the front entry, above the rain barrel. It seems like a perfect location because everyone walks by this as they come into the house. Assembly was pretty simple. I removed the existing downspout (saving the screws, etc. as I will likely want to re-install the gutter in the winter. I then threaded the chain through the downspout opening and attached the pieces.
 The only wrinkle was that the barrel was not centered under the downspout. It wasn’t even close so I had to empty the barrel and re-center the barrel so that it would splash properly. Now, we just need to wait for the rain and see how they work. I’ll be sure to post photos or who knows; maybe a video is in order.
 I think that they look pretty cool. They are a heck of a lot better looking than the white aluminum downspout that used to snake down the column. The only problem is that the gutters and eaves look like ass. One of these days, we'll get to exposing that beadboard under there but I've been holding off on that one as something tells me that will cost a bit more than 40 bucks.
 While installing the chains, I watered the garden and got a look at things outside. Everything is on the verge of bursting with flowers. I still have a couple bare spots where seeds didn’t take but I am not too concerned right now. The daisies are in full bloom as are a few other perennials. I had to hold back from moving things around. Maybe in the rain later this week…


 After cleaning the gutters, I decided to hook up a soaker hose to the front rain barrel. Hopefully this will make watering the front garden that much easier. It is a little obtrusive as it snakes in and out of the plants (and around my daughter's "decorative" stone and glass work) but I am sure it will disappear in no time. Since I was in the yard, I decided to throw a few plants in the ground as well.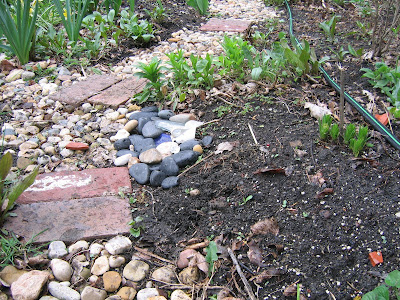


 Oh, and no room is complete in the Tiny Bungalow anymore unless I can spray-paint something in it with faux hammered metal. I did the light switch plate here. Very classy but it kind of clashes with the fixture the PO installed.
  Since today was incredible outside, I decided to get the rain barrels in place. I changed out the screens and put in new ones. I also got some CMU and have each barrel lifted higher than they were last year. Hopefully this will improve the water pressure. It makes them a little more obtrusive but I don't really care.
 The flowers look nice and I cleared two areas to start some more perennials from seed. I don't have a lot of hope for them but I guess we'll see. The tulips (the white ones) are going a little wacky.
  I don't think I've seen a tulip open up like these - too funny. Its like they are jealous because they seemed plain next to the purple ones so they thought they'd yell out a little cry for attention. They really fill up the yard. We cut a few and brought them indoors and they really went nuts.
 2. Live in an old home.
 6. Compost.
 7. Repair, don't replace.
  9. Put in some CFLs.Look, they even have holiday ones now!
 10. Install a rain barrel
 After a couple weeks of using the rain barrels, I have learned a couple of things. I can water the yard (front and back planting beds and garden) daily for a week before I run out of water. Perhaps I'll get two more next year for the other side of the house because they are working well. Unfortunately, I can't use a soaker hose unless the barrel is completely full. So I need to find some other way to easily water the wildflowers coming up in the front. I also have a little tweaking to do with the barrel installation as my front barrel is creating a lot of splash onto the stucco during a rainstorm. This is not good.
 We are almost used to the whole composting thing. We located the pile adjacent to the garden. It is separated by a wire fence "pen". I have been trying to layer kitchen wastes with yard waste and stockpiled leaves. We keep a medium size tupperware container near the sink and put all peels, coffee grounds, etc. in it and dump it when it fills (every couple of days). I create two stockpiles at the front of the pen, one for yard waste (weeds, grass clippings, etc. - these I collect each morning I work in the yard) and another of old leaves. The only reason I have these is because I had a scarecrow from Halloween that we never disposed of. I turn the pile weekly and water it every other day. It is already looking pretty good and there are no odd smells or visible signs of rodents. Even the rabbits are getting more scarce.
 It has been a very busy weekend. I rented a mulcher/chipper and finally got rid of the pile of brush that once was our front bushes. It is amazing, a pile of brush 5 feet tall, twenty feet wide and 15 feet deep yielded about a garbage bag full of mulch. I expected I'd be mulching the entire yard and more but with this amount, it is just not worth it. The back corner of our yard is now ready for planting.

 My friend Pete came out again to help out with some of the work. Luckily he did
  come out because installing the rain barrel was not as easy as I had thought it would be. We dug out the area adjacent to our porch, installed a bed of gravel, compacted it and built up a small step for the barrel.
 We cut the screen (to prevent mosquitoes) to size, fit on the lid, and then covered it with stone. we had to cut the downspout to the right length and I even took some time to clean out the gutters.
  We completed the front by planting some switch grass that will hopefully grow up and conceal the barrel. It rained this afternoon and we are already collecting water.
  All in all, I think that the yard is vastly improved over what it looked like a couple weeks ago. Once I plant the garden and complete the compost bin, I will consider, except for maintenance, the yard "completed" for this year.
